This post may contain affiliate links. Please read our disclosure policy.
Table of Contents
- Quick Meat Temperature Guide
- Why You Should Use a Meat Thermometer
- The Meat Thermometer I Recommend Keeping Close
- What Part of the Thermometer Reads the Temperature?
- Where Should You Insert a Meat Thermometer?
- How to Check Chicken, Steak, Burgers, and More
- Safe Temperature vs. Preferred Doneness
- What Is Carryover Cooking?
- How Long Should You Wait for the Reading?
- Should You Check Meat While It Is Still on the Heat?
- Instant-Read vs. Leave-In Thermometers
- Why an Infrared Thermometer Is Not Enough
- Common Meat Thermometer Mistakes
- Can You Tell Meat Is Done by Looking at It?
- How to Test Your Thermometer for Accuracy
- When Should You Check Your Thermometer?
- Do You Need to Wash the Thermometer Between Readings?
- Meat Thermometer FAQ
- My Final Thoughts
Have you ever followed a recipe, cooked your meat for the recommended amount of time, and still ended up with dry chicken, an overcooked steak, or a burger that had you second-guessing the middle?
Listen, we have all been there.
The recipe said 20 minutes. You gave it 20 minutes. The outside looked good. The juices looked right. But when you cut into it, either it was dry as cardboard or you were standing there wondering if it needed more time.
Listen, time is a guideline — temperature is the truth.
The thickness of the meat, the starting temperature, your oven, your grill, your pan, the heat level, and even where the meat is sitting can all change how fast it cooks. Two chicken breasts can be on the same grill at the same time and still finish at different times.
That is why I always say: stop guessing and start checking.
A meat thermometer takes the mystery out of cooking. It tells you what is actually happening inside the food instead of making you rely on looks, time, or hope.
In this guide, I am going to show you how to use a meat thermometer the right way for chicken, steak, burgers, pork, fish, roasts, and more.
Because around here, we are taking the mystery out of cooking — one temperature at a time.
Quick Meat Temperature Guide
Before we get into the details, here is a quick safety reference you can come back to.
| Food | Safe minimum internal temperature |
|---|---|
| Chicken and turkey, whole or pieces | 165°F |
| Ground chicken or turkey | 165°F |
| Ground beef, pork, lamb, or veal | 160°F |
| Beef, pork, lamb, or veal steaks, chops, and roasts | 145°F, followed by a 3-minute rest |
| Fish | 145°F |
| Egg dishes | 160°F |
| Leftovers and casseroles | 165°F |
Why You Should Use a Meat Thermometer
A lot of home cooks check meat by color, clear juices, texture, or how long it has been cooking.
Those signs can help, but they are not always reliable. Chicken can still have a little pink color and be safe. A burger can turn brown before it is fully cooked. A pork chop can look done on the outside and still need more time in the center.
That is where the thermometer comes in.
A meat thermometer helps you answer two questions:
- Is this food safe to eat?
- Is this food cooked the way I want it?
Those are not always the same question. Chicken and ground meats have food-safety temperatures you need to respect. Steak is different because some people like it rare, medium-rare, medium, or well done. But you still need to understand the difference between preference and safety guidance.
The thermometer gives you control. Instead of cooking chicken “just a few more minutes to be safe” until it turns dry, you can check the actual internal temperature and pull it when it is ready.
That means better food, safer food, and more consistent results.
The Meat Thermometer I Recommend Keeping Close
You do not need to cut every piece of meat open to see if it is done. That lets the juices run out and still does not always tell you the full story.
A good instant-read thermometer gives you the number fast without tearing up the food. If you are grilling, smoking, roasting, air frying, or cooking meat on the stovetop, keep one close.
AB’s Safety Pick: A Fast Meat Thermometer
If you do not have a dependable instant-read thermometer yet, keep one near the stove, grill, smoker, or air fryer. It is one of the easiest ways to stop guessing and start cooking with confidence.
It is not just a beginner tool either. Good cooks use thermometers because consistency matters. When you know the internal temperature, you can repeat your results instead of hoping it comes out the same way next time.
What Part of the Thermometer Reads the Temperature?
Here is something a lot of people do not realize: the entire metal probe does not always read the temperature.
Depending on the thermometer, the sensor may be near the tip or along a small part of the probe. That means you need to get that sensing area into the center of the thickest part of the food.
Do not just poke the very tip into the outside and call it done. The outside of the meat is usually hotter than the center. If your thermometer is too shallow, it can give you a reading that looks ready even though the middle still needs more time.
Always read the instructions that came with your thermometer so you know where the sensor is and how deep it needs to go.
Where Should You Insert a Meat Thermometer?
Most of the time, you want to insert the thermometer into the thickest part of the food.
Avoid:
- Bone
- Large pockets of fat
- Gristle
- The pan
- The grill grate
- The outside surface of the meat
You are trying to find the temperature in the center of the meat, not the hot edge or the bone. If the food is large or uneven, check more than one spot.
That is especially important for whole chickens, turkeys, roasts, thick chicken breasts, and big cuts of meat.
How to Check Chicken, Steak, Burgers, and More
How to Check Chicken Breast
Chicken breast can go from juicy to dry real fast, so this is one place where a thermometer really helps.
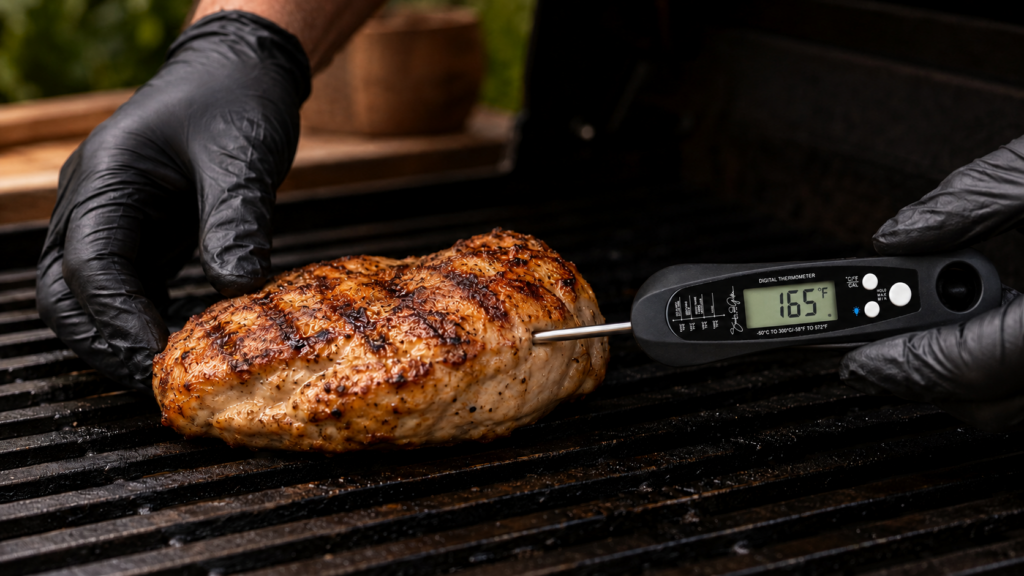
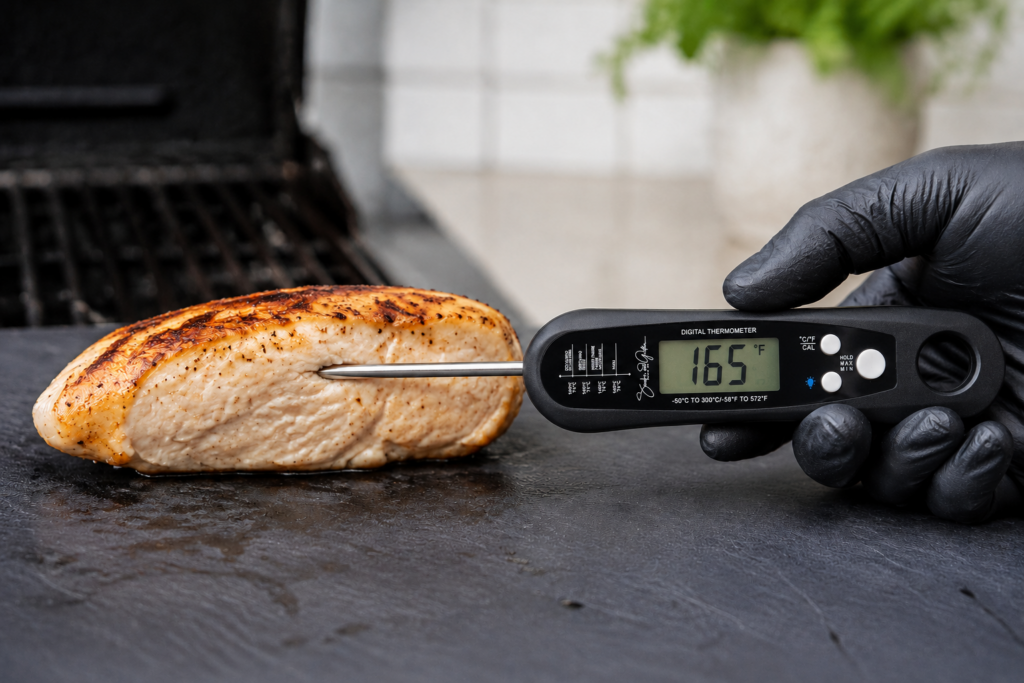
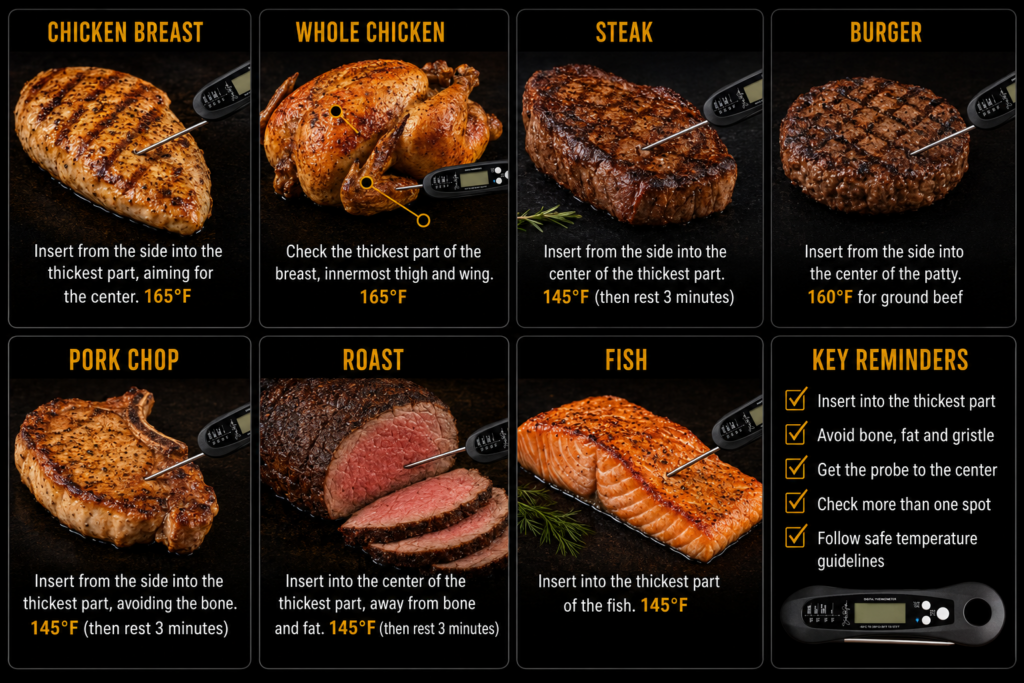
For a boneless chicken breast, find the thickest part. Instead of pushing the thermometer straight down from the top, try inserting it from the side. Guide the probe toward the center of the thickest section.
That gives you more room to position the sensor correctly. Be careful not to push the probe all the way through the other side. If the tip gets too close to the pan, grill, or air fryer basket, you may get a false reading.
Chicken breast should reach 165°F.
How to Check Bone-In Chicken
For thighs, drumsticks, wings, or bone-in chicken breasts, insert the thermometer into the thickest part of the meat. Do not touch the bone.
Bone heats differently than the meat around it, so if your probe is touching bone, the reading may not be accurate. With bone-in chicken, check more than one spot if the pieces are large or uneven.
Chicken should reach 165°F for safety. Chicken thighs and drumsticks are safe at 165°F, but some cooks like to take dark meat a little higher because it can become more tender. That is a texture choice, not a different safety rule.
How to Check a Whole Chicken or Turkey
A whole bird needs more than one temperature check. Do not just check the breast and call it done.
For a whole chicken or turkey, check:
- The thickest part of the breast
- The innermost part of the thigh
- The innermost part of the wing
All of those areas should reach at least 165°F. If the bird is stuffed, the center of the stuffing also needs to reach 165°F.
How to Check Steak
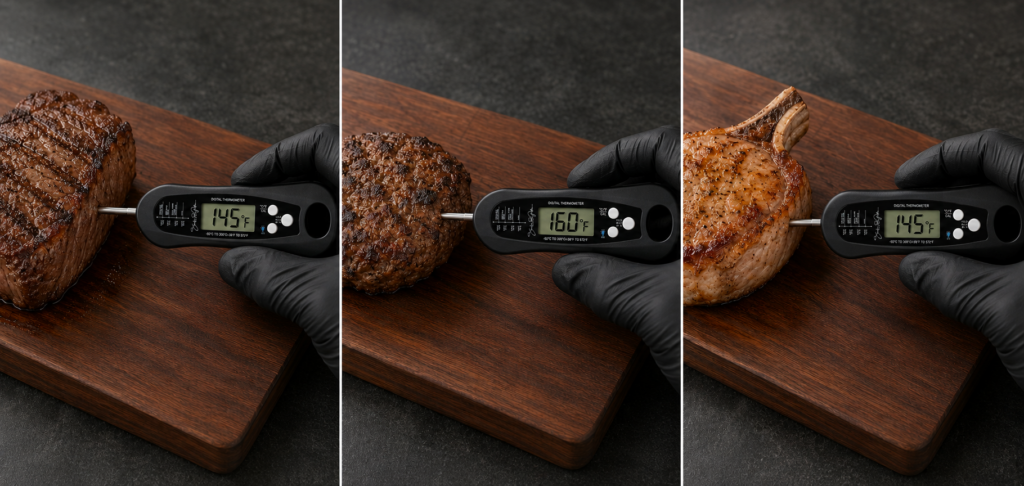
For a thick steak, insert the thermometer from the side and aim for the center. That helps you reach the coolest part of the steak without putting the sensor too close to the hot pan or grill grate.
Make sure the probe is not sitting in a strip of fat. If you are cooking more than one steak, check each one. They may look the same, but small differences in thickness can change the cooking time.
USDA food-safety guidance for whole cuts of beef starts at 145°F with a 3-minute rest.
Now, let’s keep it real. A lot of steak lovers use different doneness targets for rare, medium-rare, medium, and well done. That is a preference decision. Just understand the difference between official food-safety guidance and personal doneness.
The thermometer helps you make that choice on purpose instead of guessing.
How to Check Burgers
Burgers can be tricky because they are thinner than steaks. Do not just poke straight down from the top unless the patty is thick enough for the sensing area to reach the center.
For most burgers, insert the thermometer from the side and guide it into the middle of the patty. That gives you a better reading of the center.
Ground beef, pork, lamb, and veal should reach 160°F. Ground chicken or turkey should reach 165°F.
And do not rely on color. A burger can be pink and safe, or brown and not safe yet. Check the number.
Why Ground Meat Needs a Higher Temperature
People ask this all the time: “If steak can be cooked one way, why does a burger need a different temperature?”
Here is the simple answer. On a whole steak, bacteria are usually on the outside surface. When the steak cooks, that outside gets direct heat. But when meat is ground, the outside gets mixed all through the meat. Now what used to be on the surface can be in the center of the burger.
That is why ground meat needs to be cooked more thoroughly. For ground beef, pork, lamb, and veal, aim for 160°F. For ground poultry, aim for 165°F.
How to Check Pork Chops
For pork chops, insert the thermometer from the side and aim for the center of the thickest part. If the chop has a bone, stay away from the bone.
Whole cuts of pork should reach 145°F, followed by a 3-minute rest. That rest matters. It is part of the USDA recommendation.
And let me say this: pork does not need to be cooked until it is dry and gray all the way through. Use your thermometer and give yourself a chance at a juicy pork chop.
How to Check a Roast
For beef, pork, lamb, or veal roasts, insert the thermometer into the thickest part of the meat. Avoid bone, fat pockets, gristle, and the bottom of the pan.
If you are using a leave-in probe thermometer, place it before the roast goes into the oven or smoker. Make sure the probe is actually rated to stay in during cooking.
If you are using an instant-read thermometer, start checking when the roast is getting close to the expected finish time. Large roasts can have different temperatures in different spots, so check more than one area before pulling it off the heat.
Whole beef, pork, lamb, and veal roasts should reach 145°F with a 3-minute rest.
How to Check Fish
Fish cooks fast, so do not wait too long to start checking. Insert the thermometer into the thickest part of the fish.
For a thick fillet, you may be able to go in from the side. For a thinner piece, angle the probe carefully so the sensing area reaches the center without going all the way through.
Fish should reach 145°F. Once fish goes too far, it can turn dry quick. That thermometer helps you catch it while it is still tender and flaky.
Safe Temperature vs. Preferred Doneness
This is where a lot of confusion happens. A safe minimum temperature tells you the number recommended for food safety. Preferred doneness is about how you like the food to eat.
For some foods, you may cook past the safe minimum because the texture gets better. Chicken thighs are a good example. They are safe at 165°F, but some people cook them higher because the dark meat can become more tender.
For lean chicken breast, though, cooking way past 165°F can dry it out.
The thermometer gives you information. Once you know the number, you can decide what to do next. That is better than cooking blind.
What Is Carryover Cooking?
Carryover cooking means the food keeps rising in temperature after you take it off the heat. The outside of the meat is hot, and that heat keeps moving toward the center while the food rests.
How much the temperature rises depends on:
- The size of the meat
- The thickness
- The cooking temperature
- The cooking method
- Whether it is bone-in
- How long it rests
- Whether it is covered
A large roast may rise several degrees after you pull it. A thin pork chop or chicken breast may not rise as much. That is why I do not like giving one rule for everything, like “always pull it five degrees early.”
Pay attention to the food you are cooking. Watch the temperature and learn how it responds.
How Long Should You Wait for the Reading?
Do not pull the thermometer out the second the first number pops up. Give it a moment.
Some thermometers read fast. Others take longer. Wait until the number stabilizes.
For thicker meat, you can slowly move the probe through the center and watch the temperature. You may see the number drop when the sensor hits the coolest part. That lowest central reading is usually the one you need to pay attention to.
Should You Check Meat While It Is Still on the Heat?
You can, but be careful. If the thermometer touches the grill grate, hot skillet, baking sheet, roasting pan, or air fryer basket, the reading can be wrong.
For thin foods, it may be easier to briefly remove the food from the heat, check it from the side, and then return it if needed.
Also, try not to leave the oven, grill, smoker, or air fryer open too long. Heat escapes fast. Check smart, close it back up, and keep cooking if you need to.
Instant-Read vs. Leave-In Thermometers
Instant-read thermometer
An instant-read thermometer is for quick checks. Use it for:
- Chicken breasts
- Steaks
- Burgers
- Pork chops
- Fish
- Smaller cuts
- Checking several pieces of food
Unless the manufacturer says it is safe to do so, do not leave an instant-read thermometer in the oven, grill, smoker, or air fryer.
Leave-in probe thermometer
A leave-in probe thermometer is made to stay in the food while it cooks. Use it for:
- Whole chickens
- Turkey
- Large roasts
- Brisket
- Pork shoulder
- Long smoking sessions
Always follow the instructions and temperature limits for your specific thermometer.
Why an Infrared Thermometer Is Not Enough
An infrared thermometer checks surface temperature. It can be useful for checking a cast-iron skillet, griddle, pizza stone, flat-top, or some cooking surfaces.
But it does not tell you the internal temperature of a chicken breast, burger, roast, steak, or pork chop. Surface temperature and internal temperature are two different things. For doneness, use a probe-style food thermometer.
Common Meat Thermometer Mistakes
Inserting the probe too shallow
If the probe is only near the surface, the reading may be hotter than the center. Get into the thickest, most central part.
Touching bone
Bone can affect your reading. Keep the probe in the meat, not against the bone.
Checking a pocket of fat
A big piece of fat may not reflect the temperature of the meat. Move the probe and check again.
Checking only one spot
Large or uneven foods can have cooler areas. Check multiple spots when needed.
Checking only one piece
If you are cooking several chicken breasts, burgers, or pork chops, do not assume they all finish together. Check the biggest piece first, then check others if needed.
Trusting time over temperature
A recipe might say 20 minutes, but your food might need 17 or 25. Use time as a guide. Use temperature as the final answer.
Reading too quickly
Wait for the number to settle. Do not rush the reading.
Using the wrong thermometer
Do not use a surface-only infrared thermometer to check internal doneness. Use a probe thermometer.
Leaving an instant-read thermometer in the oven
Only leave a thermometer in the food if it is designed for that.
Forgetting to clean the probe
If your thermometer touches raw or undercooked meat, clean it before using it again on cooked food. Wash and sanitize the probe according to the manufacturer’s directions.
Can You Tell Meat Is Done by Looking at It?
Not reliably. Color can fool you. Juices can fool you. Firmness can fool you. Cutting into the center can dry the meat out and still not tell you everything.
A thermometer gives you a number. That number lets you make a confident decision.
How to Test Your Thermometer for Accuracy
If your thermometer starts giving strange readings, test it. One easy way is the ice-water test.
Ice-water test
- Fill a glass with plenty of ice.
- Add clean water.
- Stir it well.
- Insert the thermometer probe into the ice water.
- Do not let the probe touch the bottom or sides of the glass.
- Wait until the reading stabilizes.
- It should read close to 32°F.
If it does not, check your thermometer’s instructions. Some models can be calibrated. Some digital models may need to be reset, serviced, or replaced. A thermometer only helps if it is accurate.
When Should You Check Your Thermometer?
Check your thermometer if:
- It has been dropped
- It has not been used in a while
- The readings seem strange
- It has been exposed to extreme temperature changes
- You are about to do an important cook
- You use it all the time for grilling or smoking
Do You Need to Wash the Thermometer Between Readings?
Yes. Especially if the probe touched raw or partially cooked meat.
Clean the probe before using it on finished food or another item. Follow the cleaning instructions for your thermometer. Unless the product says it is waterproof, do not submerge the whole unit in water.
Keep the probe clean and keep your food safe.
Meat Thermometer FAQ
Where do you put a meat thermometer?
Put it in the thickest part of the food and aim for the center. Stay away from bone, fat pockets, gristle, the pan, and the grill grate.
What temperature should chicken reach?
Chicken and turkey should reach a safe minimum internal temperature of 165°F.
Should you check burgers from the top or side?
For most burgers, check from the side so the sensing area can reach the center of the patty.
Can you tell meat is done by color?
Not reliably. Meat can look brown before it is safe, or stay slightly pink after it reaches a safe temperature. Use a thermometer.
How do you test a meat thermometer?
Use the ice-water test. A properly reading thermometer should settle close to 32°F in a well-stirred glass of ice water.
My Final Thoughts
A meat thermometer does not make cooking complicated. It makes cooking easier.
Instead of guessing whether your chicken is done, cutting every burger open, or leaving pork chops on the heat until they dry out, you can check the real internal temperature.
Remember the basics:
- Check the thickest part.
- Aim for the center.
- Stay away from bone, fat, and gristle.
- Check more than one spot when needed.
- Wait for the number to stabilize.
- Follow safe minimum temperatures.
- Clean the probe between uses.
- Test your thermometer once in a while.
Once you know where to place the probe and what temperature you are looking for, you are going to cook with more confidence.
Safer food. Juicier meat. Better results.
And that is what we do around here.
We take the mystery out of cooking.
#MysteryOutOfCooking